Difference between revisions of "Location Table Exchange Format importieren"
| Line 10: | Line 10: | ||
Im Beispielfenster wurden die Felder nach folgender Vorgehensweise ausgefüllt: | Im Beispielfenster wurden die Felder nach folgender Vorgehensweise ausgefüllt: | ||
| − | ''' | + | '''Datenbank''' |
| − | : | + | :Im Feld '''Datenbankdatei''' lässt sich festlegen, wo die Datenbank gespeichert wird. Dazu gibt es zwei Möglichkeiten: |
| + | :*Wählen einer bestehenden Datenbank. Durch Klick auf das Ordnersymbol [[file:button_folder.png|alt=|link=]] öffnet sich das Datenverzeichnis, wo eine bestehende und leere Firebird-Datenbank (*.fdb) ausgewählt wird. | ||
| + | :*Erstellen einer neuen Datenbank: Dazu wird das zuständige Kästchen aktiviert und durch Klick auf das Ordnersymbol [[file:button_folder.png|alt=|link=]] der gewünschte Speicherort ausgewählt. Nun kann im Textfeld ein beliebiger Name für die Datenbank eingegeben werden, der jedoch mit der Formatbezeichnung ".fdb" enden muss. | ||
| − | |||
| − | |||
| − | |||
| − | + | :{{Warnung}} | |
| − | :{{ | ||
::Please note that in either case, the database '''cannot''' be created on a network drive and/or server! | ::Please note that in either case, the database '''cannot''' be created on a network drive and/or server! | ||
Revision as of 17:09, 1 October 2015
Werkzeugleiste Import/Export → Location Table Exchange Format importieren | Menü Import → Location Table Exchange Format importieren...
![]()
Ein Klick auf den Button oder die Menüfunktion öffnet das Fenster Import TMC Location Table Exchange Format, mit dem sich eine Location Table importieren lässt.

Im Beispielfenster wurden die Felder nach folgender Vorgehensweise ausgefüllt:
Datenbank
- Im Feld Datenbankdatei lässt sich festlegen, wo die Datenbank gespeichert wird. Dazu gibt es zwei Möglichkeiten:
- Wählen einer bestehenden Datenbank. Durch Klick auf das Ordnersymbol
 öffnet sich das Datenverzeichnis, wo eine bestehende und leere Firebird-Datenbank (*.fdb) ausgewählt wird.
 - Erstellen einer neuen Datenbank: Dazu wird das zuständige Kästchen aktiviert und durch Klick auf das Ordnersymbol der gewünschte Speicherort ausgewählt. Nun kann im Textfeld ein beliebiger Name für die Datenbank eingegeben werden, der jedoch mit der Formatbezeichnung ".fdb" enden muss.
- Wählen einer bestehenden Datenbank. Durch Klick auf das Ordnersymbol
 Wichtiger Hinweis
- Please note that in either case, the database cannot be created on a network drive and/or server!
Source file
- If your Location Table file comes as a ZIP-file (file format: *.zip), browse for it on your computer and define it here.
- If your Location Table consists of a number of DAT-files (file format: *.dat) leave this field blank and use Source directory instead:
Source directory
- Browse for and indicate the directory where your Location Table (consisting of a number of files in DAT format) is stored. Those DAT-files have to be saved within one single folder.
- If your Location Table is a ZIP-file, leave this field empty and fill in the field Source file instead!
- As soon as a valid folder containing the necessary DAT-files is selected, the name of the corresponding Location Table is shown in the lower part of the window (large white space):
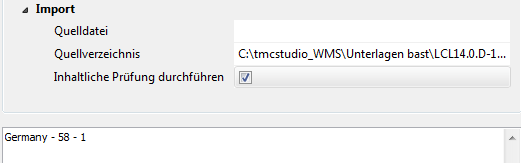
Run semantic checks
- It is highly recommended that you tick this option for every Location Table you import into your database!
- Visit the Semantic Checks page to learn more about this function.
To start the data import, click the OK button.
Now your Location Table is being imported, the database tables created and the data checked. This may take some seconds.
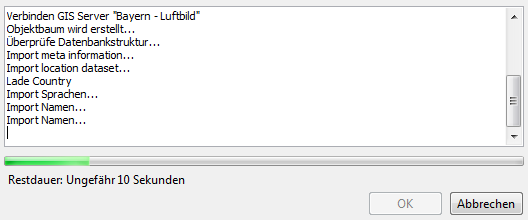
As soon as this process is completed and in case you ran the import routine including the semantic checks, a list of check statements is shown.
Visit the Inhaltliche Prüfung page to learn how to proceed.