Difference between revisions of "Semantic Checks"
| Line 40: | Line 40: | ||
| − | [[file:prüfung-alle-auswaehlen.png|alt=|link=]] [[file:prüfung-keine-auswaehlen.png|alt=|link=]] In order to (de)select any entries, use the buttons '''Select all''' | + | [[file:prüfung-alle-auswaehlen.png|alt=|link=]] [[file:prüfung-keine-auswaehlen.png|alt=|link=]] In order to (de)select any entries, use the buttons '''Select all''' and '''Deselect all'''. This can also be done by right-clicking on the list of checks. |
| − | [[file:button_filter.png|link=|alt=]] | + | [[file:button_filter.png|link=|alt=]] You can use this butten to '''show only checks containing errors'''. |
| Line 50: | Line 50: | ||
:[[File:warnschild.png|20px|link=|alt=]] Please note, that the Excel document contains several sheets with results! | :[[File:warnschild.png|20px|link=|alt=]] Please note, that the Excel document contains several sheets with results! | ||
| − | |||
| − | |||
| − | |||
Revision as of 16:10, 19 May 2016
The Semantic Checks window is accessed either by the Checks menu or - in case of the corresponding option having been set - as a part of the Import Location Table Exchange Format function.
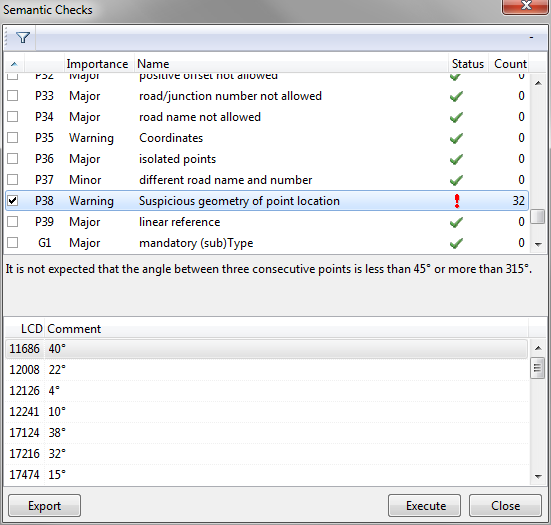
This window lists all checks performed on the data. The column Status displays:
![]() for a passed test
for a passed test
![]() for a failed test. This means that there is at least one object containing potential errors.
for a failed test. This means that there is at least one object containing potential errors.
With the latter, the column Count states the number of objects which did not pass the test.
![]() if a test has not yet been conducted.
if a test has not yet been conducted.
Click any record (i. e. line) to view the detailed explanation of the corresponding test:

Further details regarding the tests are given in the .PDF document 'TMC Location Table Requirements' that can be found in the directory where your TMC program is installed.
Clicking any test with a "fail" status will display a commented list of the objects which caused the test to fail, in the lower part of the window:

The window Semantic Checks contains the following buttons and functionalities:
![]() To conduct or repeat one or several checks, select the corresponding entries and click this button to execute the selected checks.
To conduct or repeat one or several checks, select the corresponding entries and click this button to execute the selected checks.
![]() The button Reset Checks resets all checks, whether they have been selected by the user or not.
The button Reset Checks resets all checks, whether they have been selected by the user or not.
![]()
![]() In order to (de)select any entries, use the buttons Select all and Deselect all. This can also be done by right-clicking on the list of checks.
In order to (de)select any entries, use the buttons Select all and Deselect all. This can also be done by right-clicking on the list of checks.
![]() You can use this butten to show only checks containing errors.
You can use this butten to show only checks containing errors.
![]() This button generates an Excel document containing the results of the checks. Uppon clicking the button, you are required to save the document, befor you can open it.
This button generates an Excel document containing the results of the checks. Uppon clicking the button, you are required to save the document, befor you can open it.
 Please note, that the Excel document contains several sheets with results!