Import Location Table Exchange Format
The Import TMC Location Table Exchange Format window can be accessed by applying either of the following actions:
- Import Location Table Exchange Format into new database... from the welcome screen
- Click the
 Import Location Table Exchange Format button
 - Open the Import menu and choose Import Location Table Exchange Format
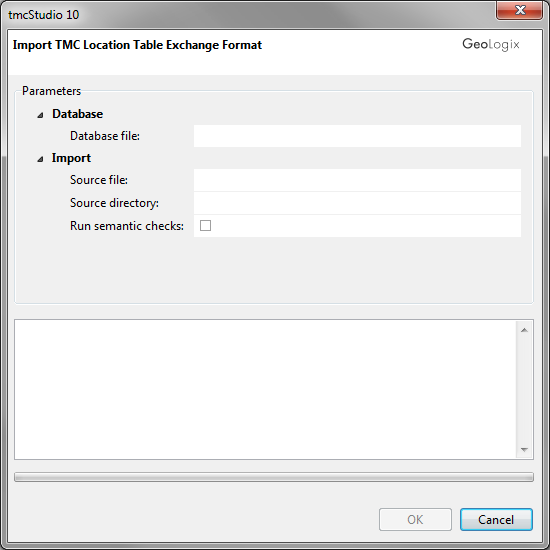
In the window, fill in all fields according to the instructions below to import a Location Table.
Database file
- Here you need to define the database to which the Location Table file will be imported to. Using the
 Folder button on the right of the text field, you have to choose from two possibilities:
- Create a new database: To do so, browse to a locally saved directory where the new database has to be stored, type in a name for it and do not forget to add the ending ".fdb" to it. Note that the database CANNOT be created on a network drive and server, respectively!
- Choose an existing database: Navigate to an existing and empty Firebird database (*.fdb)
- Instead of pointing to an existing FDB you may also name and define a new one: Just
- The database has to be stored locally (on your physical harddrive, NOT on a network drive or server!).
Source file
- If your Location Table file comes as a ZIP-file (file format: *.zip), browse for it on your computer and define it here. If your Location Table consists of a number of DAT-files (file format: *.dat) leave this field blank and use Source directory instead:
Source directory
- Browse for and indicate the directory where your Location Table (consisting of a number of files in DAT format) is stored. Those DAT-files have to be saved within one single folder. If your Location Table is a ZIP-file, leave this field empty and fill in the field Source file instead!
- As soon as a valid folder containing the necessary DAT-files is selected, the name of the corresponding Location Table is shown in the lower part of the window (large white space):
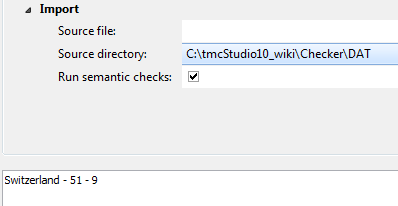
Run semantic checks
- It is highly recommended that you check this option for every Location Table you import into your database!
- Visit the Semantic Checks page to learn more about this function.
To start the data import, click the OK button.
Now your Location Table is imported, the database tables created and the data checked. This may take some seconds.
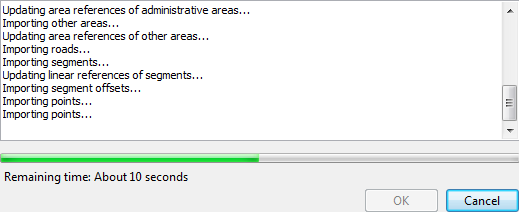
As soon as this process is completed and in case you ran the import routine including the semantic checks, a list of check statements is shown. Visit the Semantic Checks page to learn how to proceed.