Difference between revisions of "Editor"
| (18 intermediate revisions by one other user not shown) | |||
| Line 1: | Line 1: | ||
| − | + | With the '''Editor''' access level you can create, edit and manage primarily linears and points in your database. | |
| − | + | → [[Setup & Data Requirements for First Time Use|Setup & Data Requirements for First Time Use]] | |
| − | |||
| − | |||
| − | |||
| − | + | Then you might be required to add '''[[Topics|topics]]''', uppon which you can base your network links. | |
| + | Once [[Dataset Properties|'''Dataset Properties''']] has been completed, you can begin. | ||
| − | + | ==Adding Roads; Segments; Points; Intersections== | |
| + | Start by clicking on 'Linears & Points' at the top of the [[Data Tree|data tree]] and then click on [[Add Road|'''add new road''']] [[File:ImageList-119.png|link=|alt=]]. | ||
| + | |||
| + | This will make a new road appear at the bottom of the data tree called 'new road'. | ||
| + | |||
| + | Activate the '''[[Topic Information]]''' button [[File:ImageList-31.png|link=|alt=]] and click on the road in the map you want to document. | ||
| + | |||
| + | This will diplay any available information on that road in a window. | ||
| + | |||
| + | This information can be coppied (right click, then 'copy value') and pasted into the 'General' section in the window beneath the data tree. | ||
| + | |||
| + | (This only works if you have an activated shapefile grid [These can be added in the [[Topics]] submenu]) | ||
| + | |||
| + | |||
| + | |||
| + | After filling in the 'General'-information you can continue by: | ||
| + | |||
| + | * [[Add Point|'''Adding a new point''']] [[File:ImageList-118.png|link=|alt=]] at an intersection. | ||
| + | * [[Copy Point|'''Coppying an existing point''']] [[File:ImageList-138.png|link=|alt=]], if there already is a point at that intersection. | ||
| + | * If two idividually placed points both describe the same intersection, use: [[Add Intersection|'''add intersection''']] [[File:ImageList-106.png|link=|alt=]]. | ||
| + | * You can also try [[Search Road In Custom Layers|'''searching the road in Custom Layers''']] [[File:ImageList-44.png|link=|alt=]] This will highlight any road by that name on the map. | ||
| + | |||
| + | |||
| + | Once you are done adding points to your road, you can continue by: | ||
| + | |||
| + | * Adding another road | ||
| + | |||
| + | Or, if your road contains a large number of points: | ||
| + | |||
| + | * [[Add Segment|'''Adding a new segment''']] [[File:ImageList-120.png|link=|alt=]] | ||
| + | :To maintain a good data overwiev and to prevent a data overload, one individual street should not comprise more than aproximatively 50 points. | ||
| + | |||
| + | :To increase the overview or if more points are required, a road can be sectioned into segments. Use this button to add segments. | ||
| + | |||
| + | ==Linear & Point Information== | ||
| + | |||
| + | Clicking on a point or a road/linear opens a window below the [[Data Tree|data tree]]. | ||
| + | |||
| + | This window contains three/four subgroups: 'Linear'/'Point'; 'References'; 'Errors' and 'Coordinates' (only with points). | ||
| + | |||
| + | *'''Linear/Point:''' This subgroup contains general information like the name and number that serves to identify and sort the linears/points. | ||
| + | |||
| + | *'''References:''' This group diplays the hierachical surrounding of the linear/point. A linear-Refrence will usually contain the 'area' the linear belongs to. | ||
| + | |||
| + | :Point-Refrences will contain the 'area' and the 'linear' the point belongs to, plus the points that come before (negative offset) and after (positive offset) it. | ||
| + | |||
| + | *'''Errors:''' After running a '''[[Semantic Checks|semantic check]]''', all points that turned out to have errors are listed in the data tree. | ||
| + | |||
| + | :This subgroup gives information about the error and how it can be removed. | ||
| + | |||
| + | ==Jumbeled Points & Streets== | ||
| + | |||
| + | It can happen that the order of the points and streets becom jumbeled. | ||
| + | |||
| + | This can be solved by right clicking on the name of one of the points that should be positioned at the beginning of the road and then clicking on 'Reorder Points On Road'. | ||
| + | |||
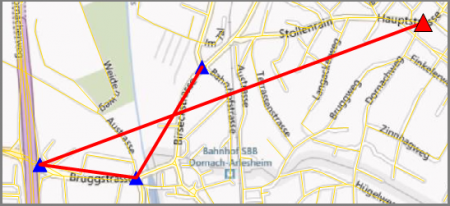
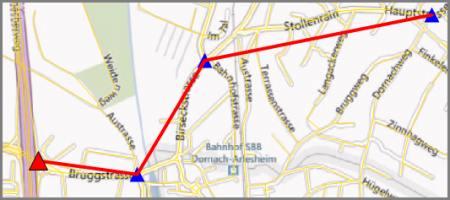
| + | These images display a before and after scenario: | ||
| + | |||
| + | [[File:RoadsJumbeled.png|450px]] | ||
| + | |||
| + | ↓ | ||
| + | |||
| + | [[File:RoadOrder.png|450px]] | ||
| + | |||
| + | ==Special Road Situations: One Way, Interrupted and Isolated== | ||
| + | |||
| + | '''One Way''': To make a one way street, you first need to generate a regular street. | ||
| + | |||
| + | If the 'Extra Attributes' are not already available in the window beneath the [[Data Tree|data tree]], the first need to be activated. | ||
| + | |||
| + | To do so, go to 'Options' [[File:ImageList-1.png|link=|alt=]] → [[Options#General|General]] → Miscellaneous. | ||
| + | |||
| + | There, tick the box next to the field '''Use Extra Attributes''' and click OK. | ||
| + | |||
| + | Now there should be additional information in the window beneath the data tree. This information consists of six boxes named 'Present +/-' 'In +/-' and 'Out +/-'. | ||
| + | |||
| + | To genrate the one way street, you need to select the point '''at which you would enter into the one way street'''. | ||
| + | |||
| + | In the Extra Attributes of this point you now need to '''remove the tick''' from '''Present -''' (present negative). | ||
| + | |||
| + | This will mark the oncomming street as being one way. | ||
| + | |||
| + | |||
| + | '''Iterrupted Road''': A road can be interrupted and continue on again under the same name at a later point. | ||
| + | |||
| + | This might happen when two motorways merge and then split up again, but during the time they run together they carry the name of only one of the two motorways. | ||
| + | |||
| + | This phenomenon can be modueled by ticking the box 'Interrups Road' in the 'Flags' menu of the points at the beginning and the end of the interruption. | ||
| + | |||
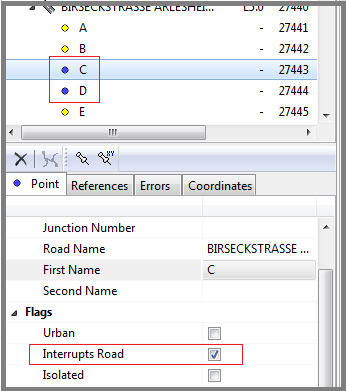
| + | In this example the points C and D stand at either end of an interruption. 'Interrupts Road' has been ticked in their 'Flags' menu. | ||
| + | |||
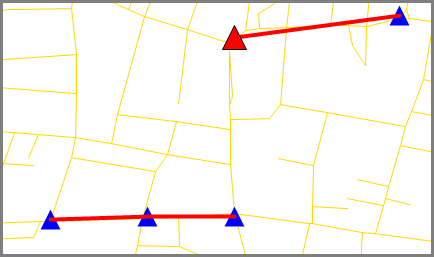
| + | As a consequence, the icons to the left of their names have turned blue. The result can be seen on the right-hand side: All points except the interrupted part are connected. | ||
| + | |||
| + | [[File:Interrupt.png|350px]] [[File:InterruptRoad.png]] | ||
| + | |||
| + | |||
| + | |||
| + | '''Isolated''': A point on a road might be isolated. An isolated point will be some distance away from the rod that is being worked on. | ||
| + | |||
| + | On a separated two way street some points, like a motorway stop, might only refer to one side of the street. In this case that point needs to be flagged as 'Isolated'. | ||
Latest revision as of 14:59, 20 May 2016
With the Editor access level you can create, edit and manage primarily linears and points in your database.
→ Setup & Data Requirements for First Time Use
Then you might be required to add topics, uppon which you can base your network links.
Once Dataset Properties has been completed, you can begin.
Contents
Adding Roads; Segments; Points; Intersections
Start by clicking on 'Linears & Points' at the top of the data tree and then click on add new road ![]() .
.
This will make a new road appear at the bottom of the data tree called 'new road'.
Activate the Topic Information button ![]() and click on the road in the map you want to document.
and click on the road in the map you want to document.
This will diplay any available information on that road in a window.
This information can be coppied (right click, then 'copy value') and pasted into the 'General' section in the window beneath the data tree.
(This only works if you have an activated shapefile grid [These can be added in the Topics submenu])
After filling in the 'General'-information you can continue by:
- Adding a new point
 at an intersection.
 - Coppying an existing point
 , if there already is a point at that intersection.
 - If two idividually placed points both describe the same intersection, use: add intersection
 .
. - You can also try searching the road in Custom Layers
 This will highlight any road by that name on the map.
Once you are done adding points to your road, you can continue by:
- Adding another road
Or, if your road contains a large number of points:
- To maintain a good data overwiev and to prevent a data overload, one individual street should not comprise more than aproximatively 50 points.
- To increase the overview or if more points are required, a road can be sectioned into segments. Use this button to add segments.
Linear & Point Information
Clicking on a point or a road/linear opens a window below the data tree.
This window contains three/four subgroups: 'Linear'/'Point'; 'References'; 'Errors' and 'Coordinates' (only with points).
- Linear/Point: This subgroup contains general information like the name and number that serves to identify and sort the linears/points.
- References: This group diplays the hierachical surrounding of the linear/point. A linear-Refrence will usually contain the 'area' the linear belongs to.
- Point-Refrences will contain the 'area' and the 'linear' the point belongs to, plus the points that come before (negative offset) and after (positive offset) it.
- Errors: After running a semantic check, all points that turned out to have errors are listed in the data tree.
- This subgroup gives information about the error and how it can be removed.
Jumbeled Points & Streets
It can happen that the order of the points and streets becom jumbeled.
This can be solved by right clicking on the name of one of the points that should be positioned at the beginning of the road and then clicking on 'Reorder Points On Road'.
These images display a before and after scenario:
↓
Special Road Situations: One Way, Interrupted and Isolated
One Way: To make a one way street, you first need to generate a regular street.
If the 'Extra Attributes' are not already available in the window beneath the data tree, the first need to be activated.
To do so, go to 'Options' ![]() → General → Miscellaneous.
→ General → Miscellaneous.
There, tick the box next to the field Use Extra Attributes and click OK.
Now there should be additional information in the window beneath the data tree. This information consists of six boxes named 'Present +/-' 'In +/-' and 'Out +/-'.
To genrate the one way street, you need to select the point at which you would enter into the one way street.
In the Extra Attributes of this point you now need to remove the tick from Present - (present negative).
This will mark the oncomming street as being one way.
Iterrupted Road: A road can be interrupted and continue on again under the same name at a later point.
This might happen when two motorways merge and then split up again, but during the time they run together they carry the name of only one of the two motorways.
This phenomenon can be modueled by ticking the box 'Interrups Road' in the 'Flags' menu of the points at the beginning and the end of the interruption.
In this example the points C and D stand at either end of an interruption. 'Interrupts Road' has been ticked in their 'Flags' menu.
As a consequence, the icons to the left of their names have turned blue. The result can be seen on the right-hand side: All points except the interrupted part are connected.
Isolated: A point on a road might be isolated. An isolated point will be some distance away from the rod that is being worked on.
On a separated two way street some points, like a motorway stop, might only refer to one side of the street. In this case that point needs to be flagged as 'Isolated'.


